This article may have affiliate links.

There’s something magical about baking the first loaf of sourdough bread for your family. The process combines ancient traditions, a bit of science, and a whole lot of patience.
For beginners, diving into sourdough baking might seem intimidating, but with the right recipe and guidance, it’s entirely achievable—and deeply rewarding.
We welcome you on this Sourdough bread journey! We hope you find all kinds of great information below to help you create your very first sourdough bread loaf.
I never realized how much happiness a fresh sourdough bread loaf would bring my family!
In this blog post, we’ll walk you through the essentials of sourdough baking, from understanding your starter to baking your first loaf.
This easy sourdough bread guide is designed to ensure your success and build confidence in the kitchen. This is the easiest, and best sourdough recipe for just starting out.
Rest assured there is no kneading or stand mixer involved. It does take time though. But trust me, this light, airy, chewy bread is worth the wait!
There are many many sourdough bread recipes on the internet, yet no two loaves look alike. It is a process, and you will grow and learn as you go. Use this tutorial and recipe as a guide but remember to make your own adjustments as you go. But don’t be afraid to ask questions, make changes, and always follow your gut.
What I have found is that sourdough is not just a recipe to follow… it is an understanding. It will take time, patience, effort and a LOT of trial and error.
When I started, I tried with bread flour… then when I ran out, I tried with all-purpose flour. I found that the bread turned out just as delicious using either type of flour.
That is the magic of sourdough… you can alter and change the process, and the results are ever changing.
Once you have a few loaves under your belt, the process will become rhythmic, and you’ll become a sourdough pro in no time.
What Is Sourdough?
Sourdough is unlike any store-bought bread. It is a naturally leavened bread made using a starter—a fermented mixture of flour and water that captures wild yeast and bacteria from the environment. Unlike breads made with commercial yeast, sourdough boasts a distinct tangy flavor, chewy texture, and impressive health benefits due to its fermentation process.
Of course, baking sourdough isn’t without its challenges. It requires a bit of a learning curve. Starters can be finicky—too warm, and they might bubble over like a science experiment gone wrong; too cold, and they’ll sulk in the corner of your kitchen, refusing to rise. But don’t let that scare you off. Half the fun is in the journey, and trust us, there’s nothing quite like pulling your first golden-brown loaf out of the oven. It’s a moment of pure, unadulterated joy.
So, whether you’re looking to up your bread game, explore the wonders of wild yeast, or just impress your friends with your newfound culinary prowess, sourdough is the way to go. It’s delicious, rewarding, and just a little bit wild
The benefits of Sourdough will open your eyes and blow your mind…
If you have not joined this train yet, hop on.
Why Sourdough?
- Health Benefits: The fermentation process helps break down gluten, making it easier to digest. It also increases the bioavailability of nutrients such as vitamin B and folate. The fermentation process creates enzymes and beneficial bacteria that help with digestion and act as a prebiotic. The bacteria in sourdough, like lactobacillus, produce lactic acid that helps pre-digest starches in grains, which can reduce bloating and digestive discomfort. I don’t know about you… but If I can eat more bread with less bloating- I am all in! Sourdough contains antioxidants, which can help the body fight off illnesses like heart disease, diabetes, and cancer.
- Flavor: Sourdough has a depth of flavor that’s unmatched by store-bought breads. It is tangy, a little sweet with a crusty shell and a soft and chewy inside.
- Sustainability: With just flour, water, and salt, sourdough is simple and environmentally friendly. Much better tasting than any store bought bread, and certainly better for you!
Before you begin you will need a sourdough starter- which is simply a live culture of flour and water.
You can find our full tutorial on starting AND feeding your starter HERE.
The Tools You’ll Need
Before starting, gather these tools:
- Mixing bowls
- Kitchen scale (highly recommended for accuracy)
- Bench scraper
- Banneton (proofing basket) or a mixing bowl
- Dutch oven
- A sharp knife or lame/razor for scoring
Ingredients
For the Homemade sourdough Starter:
- 60g all purpose flour
- 60g water (filtered)- for best results, use warm water
For the Dough:
- 500g bread flour
- 350g water
- 100g active sourdough starter
- 10g salt

Step 1: Make Your Starter
- Day 1: Mix 60g all purpose flour and 60 g water in a jar. Stir until combined. Cover loosely and let it sit at room temperature for 24 hours, until the next day.
- Day 2-6: Discard half of the mixture. Add 60g of flour and 60g water. Stir and cover again. Over time, bubbles and a sour smell will develop.
- Day 7: Your starter is ready when it’s bubbly, doubles in size within 4-6 hours of feeding, and has a pleasant tangy aroma.
Pro Tip: Label your jar to track the starter’s progress. I use a rubber band and place it at the top of the liquid, so I can see once it doubles in size.
In the summer, starters are ready within 7 days due to the warm environment. In the winter, starters take longer due to the cooler environment. Using a heating pad can help speed up the process of your starter being ready to use with baking.
Step 2: Prepare the Dough
1. Mix the Ingredients: In a large bowl, combine 500g bread flour (Or all-purpose flour works well) and 350g water. Stir until no dry flour remains. Cover and let it rest for 30 minutes (autolyse).
Autolyse is like giving your sourdough dough a pre-workout stretch—it’s the magical moment when just flour and water come together for a little “me time.” This resting phase, usually 20 minutes to 2 hours, allows the flour to fully hydrate and kickstart gluten development without you lifting a finger.
The result? A dough that’s smoother, easier to work with, and ready to rise to the occasion (literally).
It’s a simple step that takes your sourdough from “meh” to “marvelous,” and if bread could talk, it would definitely thank you for the spa day.
2. Add Starter and Salt: Add 100g of active starter and 10g salt. Mix until well incorporated.
Step 3: Bulk Fermentation
- Stretch and Fold: **This is an optional step. You can stretch and fold your dough, or, let it sit and rise without stretching and folding. Although this is optional, this step will add height and texture to your homemade sourdough bread, and… its fun to do! Over the next 4 hours, perform 4 sets of stretch-and-folds every 30 minutes. To do this, grab one side of the dough, stretch it upward, and fold it over itself. Rotate the bowl and repeat. ( If I am honest, there are times I do NOT get to this… if I leave my bread in the bowl and do not stretch and fold, it is still just as yummy!)
- Rest: Let the dough rest, and let the dough rise covered, for the remainder of the bulk fermentation. By the end, it should have a smooth side, be bubbly, and slightly jiggly. This bulk fermentation can take anywhere from 4-12 hours. It all depends on the temperature of your kitchen. The warmer the environment, the less time it takes to rise. My advice is to watch your dough and not the clock! Once your dough has doubled in size, it is ready to shape.
There are times we forget about our sourdough… when we are out of the house or busy with other things our dough can over-proof. When this happens, Do not cry!!
Over-proofed sourdough might look like a flop, but it’s actually the perfect candidate for a quick focaccia makeover!
Just stretch that airy dough into a well-oiled baking tray, dimple it generously with your fingers, and drizzle with olive oil. Sprinkle on your favorite toppings—think rosemary, flaky salt, or a handful of cherry tomatoes—and pop it in the oven. The result? A golden, crispy focaccia that turns your “oops” into an applause-worthy bread board centerpiece. Over-proofed? More like over-delicious!
Step 4: Shaping
- Flatten: Lightly flour your work surface. Turn out the dough and gently shape it into a rectangle shape.
- Shape: Fold over the long edges then roll into a ball. Place it seam-side up in a floured banneton or mixing bowl, lightly floured.

Step 5: Proofing
- Room Temperature: Proof the dough at room temperature for 1-2 hours.
- Cold Fermentation: Transfer the dough to the fridge to ferment for at least 3 hours, up to 12 hours. This step enhances the flavor and makes the dough easier to handle.
Step 6: Baking
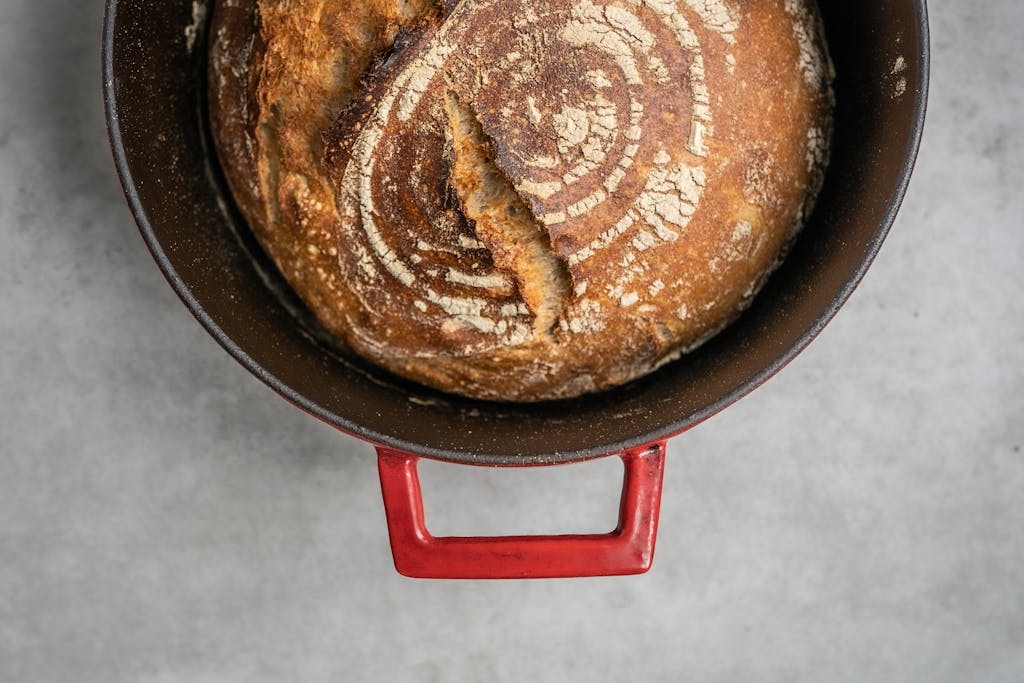
- Preheat the Oven: Place your Dutch oven inside your oven and preheat to 450°F (245°C) for at least 30 minutes- I usually place mine in while it preheats and that works perfectly.
- Score the Dough: Remove the dough from the fridge. Turn it out onto a sheet of parchment paper. Lightly flour the surface of your dough ball and use a lame, razor blade or sharp knife to score the top. (If you do not score your bread it will burst in the oven!) There are many ways to score and make designs, just be sure you have one long score along one section of your bread for it to expand.
- Bake: Carefully place dough in the hot Dutch oven while on the parchment paper. Cover and bake for 40 minutes. If you like a darker crust, remove lid and bake for another 5-8 minutes.
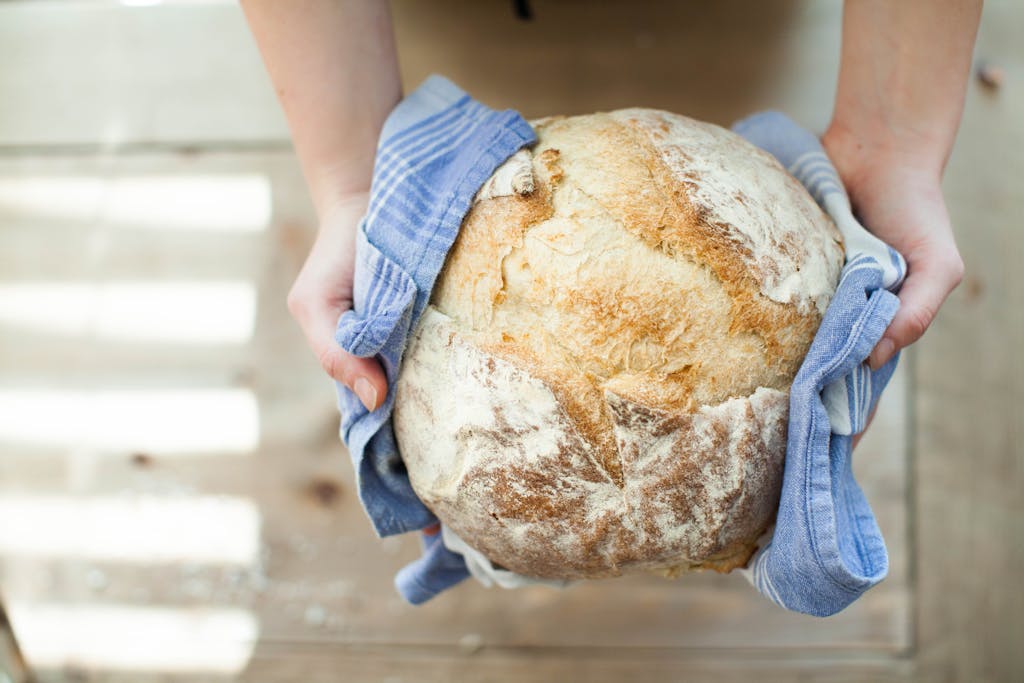
- Cool: Let the bread cool on a wire rack for at least 1 hour before slicing.
Although it may be very tempting to cut open a hot loaf of freshly baked sour dough bread, this is not a good idea. It is best to wait until your loaf is completely cooled to cut and eat. If you cut into hot sourdough bread when it has not cooled yet, it will result in a gummy texture.

Troubleshooting Tips
- Flat Loaf: Your starter might not be active enough, or the dough could be over-proofed.
- Dense Texture: Ensure proper fermentation and adequate stretch-and-folds during bulk fermentation.
- Burnt Crust: Lower the oven temperature slightly or reduce the uncovered baking time.
Why Patience Is Key
Sourdough isn’t just about baking bread; it’s about embracing the process. Each loaf teaches you something new and helps you fine-tune your skills. Remember, even experienced bakers have off days!
It takes lots of practice to create the perfect loaf. If your first loaf is not what you expected, do not give up! Try, try, try again. Keep at it, and with time you will get the hang of the process and create bread your entire family will love.
Getting Kids Involved in Sourdough Baking
Baking sourdough bread is not just about creating a delicious loaf; it’s also an opportunity to build warmth, connection, and lifelong memories with your family.
Here are some ways to get your kids involved and the benefits it brings when you bake bread together:
- Mixing the Ingredients: Kids love getting their hands messy! Let them mix the flour and water, introducing them to the tactile joy of baking.
- Stretch and Fold: Teach your children how to stretch and fold the dough during fermentation. It’s a fun way to develop motor skills and patience.
- Decorating the Loaf: Provide them with tools to make simple designs or patterns on the dough before baking. This sparks creativity and gives them ownership of the final product.
- Feeding the Starter: Assign your child the responsibility of feeding the starter. It’s a simple task that teaches them about consistency and care. They can learn from measuring out the flour and grams of water.

Benefits of Involving Kids:
- Quality Time: Baking together creates moments of connection and shared laughter.
- Life Skills: Kids learn practical skills like measuring, timing, and following instructions.
- Confidence: Completing a loaf gives them a sense of accomplishment and pride.
- Mindfulness: Baking teaches kids the value of patience and appreciating the process.
Beyond the fun, baking sourdough together is a beautiful lesson in patience and connection. It’s a slow, intentional process that mirrors how relationships grow—with time, care, and the occasional sticky mess. You’re not just making bread; you’re creating memories, teaching life skills, and showing your little ones that some of the best things take a little time (and a lot of love). And at the end of the day, everyone gets to break bread together—literally!
By making baking a family activity, you’re not just preparing food; you’re nurturing hearts and creating a warm, joyful home environment.
Starting your sourdough journey is an adventure worth taking. With just a few ingredients and a little care, you can create a loaf that’s not only delicious but also deeply satisfying. Follow this guide, be patient with yourself, and enjoy the process of learning and creating.
Ready to bake? Share your first sourdough experience with us in the comments below!
And let us know how you liked this beginner’s guide to making sourdough bread the easy way!
Baking Schedule for Sunday Bread
- Friday Evening: Feed your starter, cover the jar loosely, and leave it on the counter overnight. It should be doubled by morning, appear bubbly and smell sour.
- Saturday Morning: Make your dough. Leave on the counter to bulk rise at room temperature. Remember- in the summer it may double in size quickly- if you are not ready to bake once it has risen, you can place covered in the fridge until ready
- Sunday Morning: Shape dough. score. Bake. Cool. Eat. yum!
Be sure to try our homemade Honey Cinnamon Butter with your Sourdough bread- it is irresistible.

Sourdough for Beginners
Equipment
- 1 dutch oven
Ingredients
- 500 g bread flour OR all purpose flour
- 100 g active starter
- 350 g water
- 10 g salt
Instructions
- In a large bowl, combine 500g bread flour (Or all purpose flour works well) and 350g water. Stir until no dry flour remains. Cover and let it rest for 30 minutes (autolyse).
- Add 100g of active starter and 10g salt. Mix until well incorporated. (It will look like a shaggy ball of dough)
- Stretch and Fold: **This is an optional step. You can stretch and fold your dough, or, let it sit and rise without stretching and folding. Although this is optional, this step will add height and texture to your homemade sourdough bread, and… it's fun to do! Over the next 4 hours, perform 4 sets of stretch-and-folds every 30 minutes. To do this, grab one side of the dough, stretch it upward, and fold it over itself. Rotate the bowl and repeat. (If I am honest, there are times I do NOT get to this… if I leave my bread in the bowl and do not stretch and fold, it is still just as yummy!)
- Rest: Let the dough rest, and let the dough rise covered, for the remainder of the bulk fermentation. By the end, it should have a smooth side, be bubbly, and slightly jiggly. This bulk fermentation can take anywhere from 4-12 hours. It all depends on the temperature of your kitchen. The warmer the environment, the less time it takes to rise. My advice is to watch your dough and not the clock! Once your dough has doubled in size, it is ready to shape.
- Flatten: Lightly flour your work surface. Turn out the dough and gently shape it into a rectangle shape by pulling the sides and edges out.
- Shape: Fold over the long edges to meet in the middle then roll into a ball. Place it seam-side up in a floured banneton or mixing bowl, lightly floured.
- Room Temperature: Proof the dough at room temperature for 1-2 hours.
- Cold Fermentation: Transfer the dough to the fridge to ferment for at least 3 hours, up to 12 hours. This step enhances the flavor and makes the dough easier to handle.
- Preheat the Oven: Place your Dutch oven inside your oven and preheat to 450°F (245°C) for at least 30 minutes- I usually place mine in while it preheats and that works perfectly.
- Score the Dough: Remove the dough from the fridge. Turn it out onto a sheet of parchment paper and use a lame, razor blade or sharp knife to score the top.
- Bake: Carefully place dough in the hot Dutch oven while on the parchment paper. Cover and bake for 40 minutes. If you like a darker crust, remove lid and bake for another 5-8 minutes.
- Cool: Let the bread cool on a wire rack for at least 1 hour before slicing.
Notes
-
- Flat Loaf: Your starter might not be active enough, or the dough could be over-proofed.
- Dense Texture: Ensure proper fermentation and adequate stretch-and-folds during bulk fermentation.
- Burnt Crust: Lower the oven temperature slightly or reduce the uncovered baking time.