This post may have Affiliate Links
Flour, Water, and a Little Bit of Magic
There’s something undeniably enchanting about sourdough bread. The crackling crust, the tangy aroma, the chewy, flavor-packed bite—it’s bread in its purest, most soulful form. But behind every loaf of sourdough is a tiny, bubbling powerhouse known as the sourdough starter. Think of it as the bread’s personality: a living, breathing community of wild yeast and bacteria that makes sourdough… well, sourdough. And guess what? You can make one at home with just two ingredients—flour and lukewarm water. No magic wand required.
And we promise you, when you create your first loaf of sourdough bread, you will instantly see how much better it is than any store-bought bread.
In this guide, we’ll dive into the step-by-step process of creating your very own sourdough starter. Along the way, we’ll uncover why this ancient tradition is a boon for your gut health and how it connects you to a global community of bread enthusiasts. Ready? Let’s get you started on your sourdough starter recipe!
The Benefits of Sourdough for Your Gut: Why It’s Worth the Effort
You have probably seen sourdough increasing in popularity, and it is a good thing it is becoming more popular. Before we get into the nitty-gritty of starter creation, let’s talk about why sourdough is more than just a trendy bread choice.
- Rich in Probiotics: Sourdough is fermented, which means it’s teeming with good bacteria. These friendly microbes can help balance your gut microbiome, leading to better digestion and even improved mood.
- Easier on Digestion: The fermentation process breaks down gluten and phytic acid, two compounds that can be tough on your digestive system. Translation: sourdough is often easier for your belly to handle.
- Nutrient Boost: Fermentation unlocks more of the nutrients in your flour, making them easier for your body to absorb. Think B vitamins, magnesium, and zinc.
- Low Glycemic Index: Sourdough’s slow fermentation process leads to a bread that causes less of a blood sugar spike compared to regular bread.
- Flavor Explosion: Okay, this one’s for your taste buds. But isn’t happiness the ultimate health benefit?
So, whether you’re team “Gut Health Enthusiast” or just here for the flavor, sourdough has something for everyone. And it all starts with an active starter.
Step 1: Gather Your Tools and Ingredients
Before embarking on this journey, make sure you have everything you need. Luckily, the list is short:
- Flour: Unbleached, all-purpose flour works great for beginners. If you’re feeling adventurous, try whole wheat or rye flour for an extra microbial kick.
- Water: Filtered water or spring water is best. Chlorine in tap water can inhibit the growth of your starter, but I have been known to use it when in a pinch!
- Glass Jar: Any glass jar will work, but here is our favorite. You want a large enough mouth to be able to stir it well when feeding it. *TIP: pickle jars work best!
- A Kitchen Scale: While optional, this is the best way to ensure accurate measurements.
- A Spoon or Spatula: For stirring and scraping down the sides of your jar.
- A Loose Lid or Cloth: To cover your starter without sealing it off completely.

Step 2: Feeding Your Starter (Day by Day)
Day 1: Getting Started
- Combine 60 g flour and 60 g water in your jar.
- Stir until it forms a thick batter. Scrape down the sides so it’s nice and tidy.
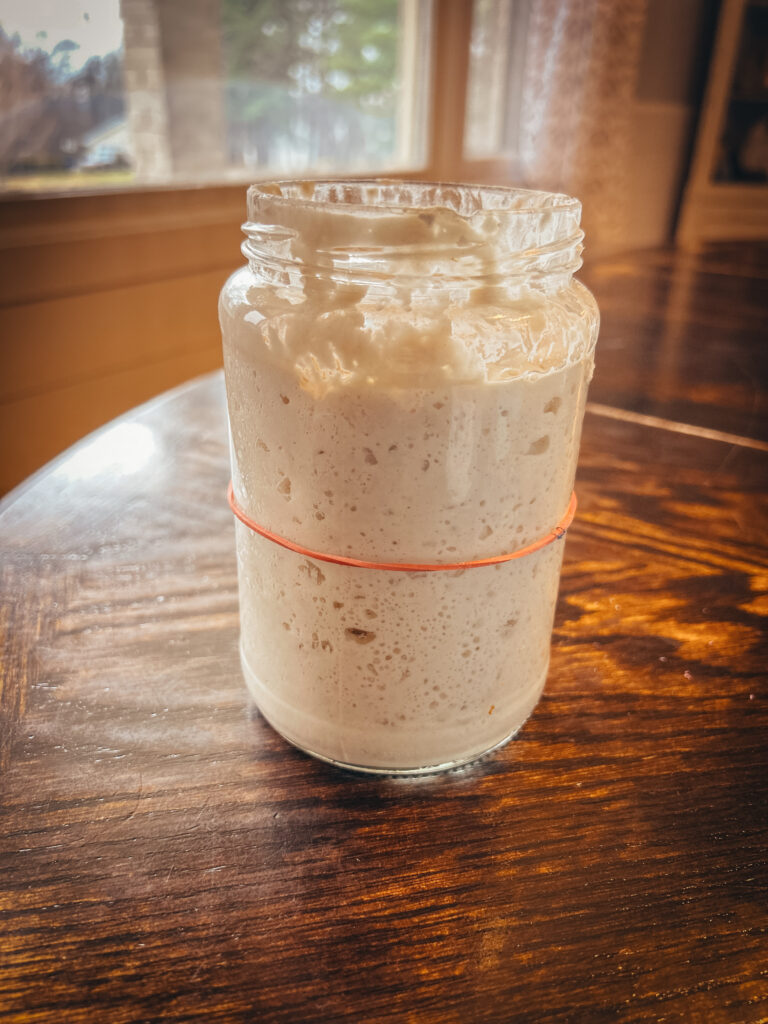
- Place a rubber band around your jar at the top of your starter- this is a good way to measure how it grows!
- Cover loosely and place the jar in a warm, draft-free spot on your kitchen counter (around 70°F is ideal).
Note: On this first day, not much will happen. Be patient; the magic is starting behind the scenes.
(You can use a jar lid half on or a cloth to lightly cover the jar- you want the starter to be able to breathe to be able to create a natural wild yeast for your bread)
*PRO TIP- It is best to establish a feeding schedule that is consistent. This way you can track and monitor the rise and fall of your starter and it will make it easier for you to identify when you have a mature starter. I like to feed first thing in the morning so I can monitor how the starter grows and track when I see small bubbles start to form on the top off the starter. Consistency is KEY.
Day 2: First Feeding

- Check your starter for any signs of life—bubbles, a faint aroma, or slight expansion. If nothing appears yet, don’t worry.
- Discard half of your starter. This keeps the microbial population balanced and prevents overflow.
- Feed with 60 grams of fresh flour and 60 grams of water. Stir well and scrape down the sides.
- Cover your remaining starter loosely and return to its warm place.
Tip: If your house is cooler than 70-73 degrees you can place your starter on a heating pad while you are awake and home to monitor. This will help it to stay warm, the warmer the starter, the best results with a quicker growing beneficial bacteria and the sooner you can bake with it.
Day 3: Getting Active
- By now, you should start seeing bubbles and a slightly tangy smell. If not, your starter might need a warmer spot or whole wheat flour for a boost.
- Repeat the discard-and-feed process: remove 60 grams of the starter, then mix in 60 grams of flour and 60 grams of water.
- Stir, cover loosely, adjust rubber band and let it rest.
Day 4: Rising Expectations
- Your starter should now have a bubbly surface and a more pronounced tangy smell.
- Repeat the discard-and-feed process as before.
- If your starter seems sluggish, consider feeding it every 12 hours instead of every 24 hours.
Day 5: Almost There

- By now, your starter should be rising and falling predictably after feedings. Look for it to double in size within 4-6 hours of feeding. (the rubber band helps us to see this process!)
- Discard half of your starter- and feed with the usual 60 grams each of flour and water.
- Keep it in a warm spot and monitor its activity until the next day.
Day 6: Nearly Ready
- Your starter should be doubling in size consistently after feeding, and the smell should be tangy and pleasant.
- Repeat the discard-and-feed process. If your starter isn’t quite doubling yet, keep feeding daily and give it more time.
Day 7: Ready to Bake
- You may have an active sourdough starter, ready to use if it doubles in size within 4-6 hours of feeding and has lots of bubbles, airy texture.
- Give it one last feed before baking, and let it rest until bubbly and active. You did it! You made a homemade sourdough starter!
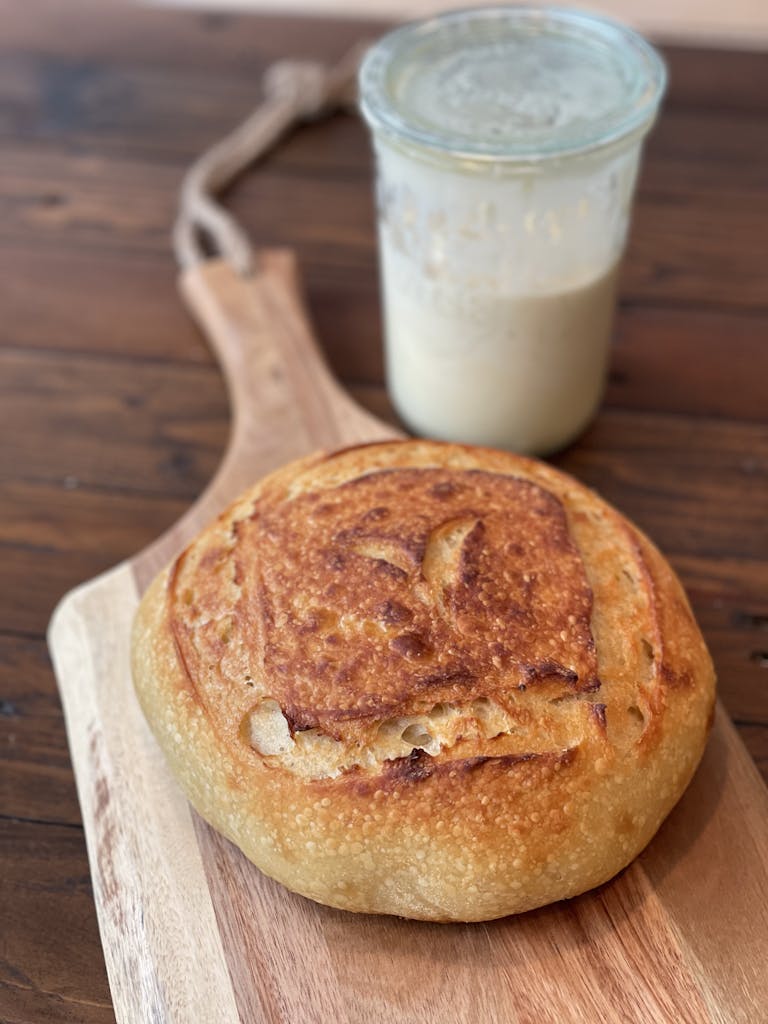
See our Sourdough Bread Recipe HERE
We have found that when you are ready to bake with your Sourdough starter, the type of flour can make a difference. Sometimes it works best using bread flour. Give it a try and see how your loaf turns out! We have been known to use all-purpose flour, whole wheat flour and bread flour. They all produce a different texture and flavor, and it is worth the experimenting to find what you like best!
Starter Maintenance: Keeping the Magic Alive
If you’re baking regularly, feed your starter daily. If not, pop it in the fridge and feed it once a week. When you’re ready to bake, take it out, feed it, and let it come to room temperature.
Fun Ways to Name Your Starter
Yes, people name their starters. It’s quirky, but it builds connection. We recommend bringing in the kids in the kitchen and working together to create a fun name for your sourdough starter. Have the kids make a little label and refer to it by it’s name. Here are some fun ideas:
- Dough-natello
- Nancy Dough
- Barbara Bread
- Fluffernutter
- Harriet
Naming your starter isn’t just fun—it’s a reminder that this little jar of life is a part of your kitchen family. A named starter is sure to make some delicious bread!
Troubleshooting Common Problems
1. My starter isn’t bubbling.
Double-check the temperature, your kitchen should be warm. You can heat up your oven and place the starter on the stovetop, place it on a heating pad or in your microwave with the door cracked so the light is on inside. If it is still slow going, you can use whole wheat flour to boost activity.
2. It smells weird.
Sourdough starters often smell tangy or even slightly funky. But if it smells like nail polish remover, it’s starving—feed it more often.
3. It’s moldy.
Unfortunately, mold means it’s time to start over. This is the ONLY time you truly need to dump your Sourdough starter and start over. Mold looks pink and can be fuzzy, if you see this it is time to start over in a fresh jar.
What is with the Grey Liquid?
When creating and maintaining a sourdough starter you will find in a couple days that there is a grey/brown liquid that forms on the top of your starter. This liquid is called “hooch” and is totally normal! This hooch indicates your starter is hungry and needs to be fed with fresh flour and water. Simply pour off most of the hooch liquid, discard half of your starter, and feed as normal.
Some people keep the hooch and stir it in when feeding- you can try both ways and see what you like best!
Why to keep your Sourdough Discard
Keeping your sourdough discard is like unlocking a treasure trove of culinary possibilities. While it may not have the strength to rise bread, sourdough discard is still packed with flavor and nutrients, making it an excellent addition to countless recipes. By saving it in its own jar, you not only reduce waste but also get creative in the kitchen. From crispy sourdough crackers and fluffy sourdough pancakes to savory waffles and flavorful pizza crusts, discard can elevate everyday recipes with its unique tangy taste. You can even use it to bake cakes, muffins, or quick breads, adding depth of flavor to sweet treats.
Embracing your sourdough discard means embracing versatility, sustainability, and the joy of experimenting with this flavorful byproduct.
When you feed your Sourdough starter you will “discard” half of the liquid. Store this Sourdough Discard in a jar in the fridge, closed tightly. When ready to use, give it a good stir and measure out what you need for your recipe.
Sourdough, Community, and Connection
Creating a sourdough starter is about more than bread. It’s about connecting with a centuries-old tradition, cultivating patience, and nurturing life in a jar. It’s also about sharing—because once you’ve mastered sourdough, you’ll want to gift loaves (and maybe starter jars) to everyone you know.
So go ahead, give it a try. Your gut will thank you, your kitchen will smell amazing, and you might just discover your new favorite hobby. And who knows? In a few months, you could be the proud parent of a sourdough starter named Dough-ris Day.
Happy baking!
Sourdough Starter
Equipment
- 1 Glass Jar
Ingredients
- 1 5 lb bag all purpose flour or bread flour
- water lukewarm filtered water works best
Instructions
- Combine 60 g flour and 60 g water in your jar.
- Stir until it forms a thick batter. Scrape down the sides so it’s nice and tidy.
- Place a rubber band around your jar at the top of your starter- this is a good way to measure how it grows!
- Cover loosely and place the jar in a warm, draft-free spot on your kitchen counter (70 degrees is ideal)
Before you Begin
- Establish a feeding schedule- Sourdough loves consistency. Feed your starter at the same time each day. This will establish consistency, which help sourdough starters thrive. Consider feeding your starter in the morning when you first wake up.
Day 1: Getting Started
- Combine 60 g flour and 60 g water in your jar.Stir until it forms a thick batter. Scrape down the sides so it’s nice and tidy.Place a rubber band around your jar at the top of your starter- this is a good way to measure how it grows!Cover loosely and place the jar in a warm, draft-free spot on your kitchen counter (around 70°F is ideal).
Day 2: First Feeding
- Check your starter for any signs of life—bubbles, a faint aroma, or slight expansion. If nothing appears yet, don’t worry.Discard half of your starter. This keeps the microbial population balanced and prevents overflow.Feed with 60 grams of fresh flour and 60 grams of water. Stir well and scrape down the sides.Cover your remaining starter loosely and return to its warm place.
Day 3: Getting Active
- By now, you should start seeing bubbles and a slightly tangy smell. If not, your starter might need a warmer spot or whole wheat flour for a boost.Repeat the discard-and-feed process: remove 60 grams of the starter, then mix in 60 grams of flour and 60 grams of water.Stir, cover loosely, adjust rubber band and let it rest.
Day 4: Rising Expectations
- Your starter should now have a bubbly surface and a more pronounced tangy smell.Repeat the discard-and-feed process as before.If your starter seems sluggish, consider feeding it every 12 hours instead of every 24 hours.
Day 5: Almost There
- By now, your starter should be rising and falling predictably after feedings. Look for it to double in size within 4-6 hours of feeding. (the rubber band helps us to see this process!)Discard half of your starter- and feed with the usual 60 grams each of flour and water.Keep it in a warm spot and monitor its activity until the next day.
Day 6: Nearly Ready
- Your starter should be doubling in size consistently after feeding, and the smell should be tangy and pleasant.Repeat the discard-and-feed process. If your starter isn’t quite doubling yet, keep feeding daily and give it more time.
Day 7: Ready to Bake
- You may have an active sourdough starter, ready to use if it doubles in size within 4-6 hours of feeding and has lots of bubbles, airy texture.Give it one last feed before baking, and let it rest until bubbly and active. You did it! You made a homemade sourdough starter!If your Starter has doubled in size, you notice bubbles and a sour smell, it is ready to use! If you are still questioning if it is ready you can do the float test.
- Float Test:Wonder if your starter is ready to bake with?Feed your starter, wait for it to double in size, and then drop a teaspoon of bubbly starter into a jar of water; if it floats to the top it’s ready to use. If you do not see these things yet- your starter is not ready at this point, which is quite common due to a cold environment, and timing. Continue feeding it for 1-2 weeks or more. Be patient! Sometimes it takes longer than 7 days, and that is perfectly normal for some starters. If you use bread flour for your starter it is a little thicker and requires a tad more water. You may find that your starter will improve with more water than flour to help it to peak. Be sure you store your starter in your fridge in a jar with tightly closed lid.Unless you plan to bake daily- then you can store your starter on the counter but it will need to be fed DAILY. I typically bake bread once per week, so my starter is kept in the fridge until the day before I plan to bake my bread.
If your Starter has yet to become bubbly and sour smelling:
- If you do not see these things yet- your starter is not ready at this point, which is quite common due to a cold environment, and timing. Continue feeding it for 1-2 weeks or more. Be patient! Sometimes it takes longer than 7 days, and that is perfectly normal for some starters. If you use bread flour for your starter it is a little thicker and requires a tad more water. You may find that your starter will improve with more water than flour to help it to peak.
- Storing your starter:Be sure you store your starter in your fridge in a jar with tightly closed lid.Unless you plan to bake daily- then you can store your starter on the counter but it will need to be fed DAILY. I typically bake bread once per week, so my starter is kept in the fridge until the day before I plan to bake my bread.